J&J Computers
  • Home
  • Products
  • Services
    • Web Design
    • Web Hosting
    • E-mail Services
    • System Repairs
    • Networking
    • Managed Services
    • Remote Support
    • Remote Backup
  • Contact Us
  • Links
    • Support Links
    • Local Links
  • Reflections
    • Blog
    • Tutorials
    • Testimonials
    • Facebook

Category Archives: Tutorials

This is an extention of our blog that we will be filling with simple tutorials on the everyday things that we are asked but yet can be done by anyone. If for any reason that you do not understand any portion of these tutorials, we suggest that you don’t do them and contact you computer support tech for assistance. If there is something that you would like us to write a tutorial on, please let us know and we will consider it for submittion.

Snipping Tool – How to take a Snapshot of a portion of your Windows screen….

Posted on 07/10/2013 by Jason Thomas

The Snipping Tool is a great way to take a quick Snapshot of a portion of your Windows screen.  Unlike using the “Print Screen” button, by using the Snipping Tool you get to highlight the are of the screen that you want to make into a graphic.

To use this tool you simply open it either by typing in Snipping Tool and selecting it in Windows 8, or for Vista and Windows 7 go to Programs –> Accessories –> Snipping Tool.  After it is launched you click on “New”, and then use the new crosshairs to select the portion of the screen you want to capture.  When you release the drag of you mouse, it will make a copy of the selected portion of the screen and place it into the Snipping Tool application.

This tool also has features such as a pen tool (with different color inks) that you can draw or write on top of the new graphic, a highlighter tool, and an eraser tool (only erases the pen and highlighter tool).

After you are done taking the screen snip you can then save it as a JPG, GIF, PNG, or HTML file.  This gives a wide variety in the uses of your new Snip.


Jason Thomas
J&J Computers
678-225-7045

J&J Computers Logo
J&J Computers Facebook Link J&J Computers LinkedIn Link J&J Computers Google Plus Link
Share
Posted in Blog, Tutorials | Tags: Screenshot, Snapshot, Snipping Tool, Windows, Windows 8, Windows 8.1 |

How to get to all apps in Windows 8 and 8.1!

Posted on 06/28/2013 by Jason Thomas

How to get to all apps in Windows 8 and 8.1!

There are distinct differences on how you get to the all apps view between Windows 8 and 8.1. There is also a way in Windows 8.1 to make the all apps view of the new user interface a default instead of having to do extra steps.

Getting to all apps in Windows 8:

1. Right click on bottom blank area of the new user interface
2. Then click on “All Apps” at the bottom right hand corner of your screen
3. To switch back to the main user interface, just repeat steps one and two

Getting to all apps in Windows 8.1:

1. Click on the down arrow on the bottom left hand corner of your screen
2. To get back to the main user interface, click on the up arrow at the bottom left hand corner of your screen

Making the all apps view default in Windows 8.1 (Not available in Windows 8):

1. Got to your desktop by clicking on the “Desktop” tile
2. Right click on the Task Bar at the bottom of your screen and select “Properties”
3. Click on your Navigation tab
4. Then check mark the option of “Show the apps view automatically when I go to Start”
5. Click on “Apply” and then “OK”
6. From now on when you select the Start Button or use your Windows Key it will go directly to the all apps view and bypass the main new user interface.

Jason Thomas
J&J Computers
678-225-7045

J&J Computers Logo
J&J Computers Facebook Link J&J Computers LinkedIn Link J&J Computers Google Plus Link
Share
Posted in Blog, Tutorials | Tags: All apps, How to, Microsoft, Tutorial, UI, User Interface, Windows 8, Windows 8.1 |

Windows 8.1 Start Menu Returns Sort of… Start Button returns is more like it!

Posted on 06/27/2013 by Jason Thomas

Windows 8.1 Start Button

Today Windows 8.1 Preview was released and we took a look at the return of the Start Menu.  Well sort of….  The Start Menu hasn’t actually returned in Windows 8.1, it really is only a Start Button.

When you click on the new Start Button it is essentially a short cut back to the new UI (User Interface).  You can make it look more user friendly by setting a check mark to show the desktop background behind the new UI.  This is done by:

1. Right clicking on the desktop task bar, going to properties.
2. Then going to the Navigation Tab.
3.  Check marking “Show my desktop background on Start”
4.  Click “Apply”
5.  Click “OK”

This setting basically makes the new User Interface, go over the desktop background picture instead of the other picture.  This isn’t much, but it does make it feel less intrusive of a switch.

The Start Button also has some very nice features by right clicking on it such as:

1. Control Panel
2. Task Manager
3.  Run
4. Device Manager
5. Search
6. Shut Down
7. And Much More….

Most people that wanted the old Window 7 style start menu back, won’t be pleased with this update.  However it is much better than not having a Start Botton at all, as is the current version of Windows 8.

Jason Thomas
J&J Computers
678-225-7045

J&J Computers Logo
J&J Computers Facebook Link J&J Computers LinkedIn Link J&J Computers Google Plus Link
Share
Posted in Blog, Tutorials | Tags: How to, Start Button, Start Menu, Start Screen, Tutorial, UI, User Interface, Video, Windows 8.1 |

Windows 8 Video Tutorial – 3 Ways to get back to the new UI

Posted on 06/20/2013 by Jason Thomas

Windows 8 Video Tutorial – 3 Ways to get back to the new UI

Since the release of Windows 8, there has been some confusion on how the new UI (User Interface) works, as well as how to get back to it after going to the desktop or other programs.  There are currently three main ways to get back to the new user interface and they are as follows:

1.  Hit the Windows button on the lower right hand side of most keyboards.

2.  Put your mouse at the upper right hand corner of your screen to show the charms bar.  Then click on the Windows logo start charm.

3.  Put you mouse at the bottom left hand corner of your screen, and a small start box will appear.  Click on that box.

Jason Thomas
J&J Computers
678-225-7045

J&J Computers Logo
J&J Computers Facebook Link J&J Computers LinkedIn Link J&J Computers Google Plus Link
Share
Posted in Blog, Tutorials | Tags: Start Screen, UI, Windows 8 |

How to Change XP Desktop or Picture

Posted on 09/14/2010 by Jason Thomas

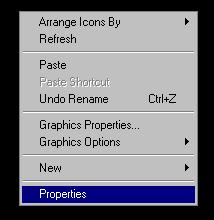
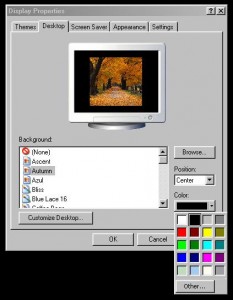
1.  Right click on any blank area of your desktop, then select “Properties” from the menu.

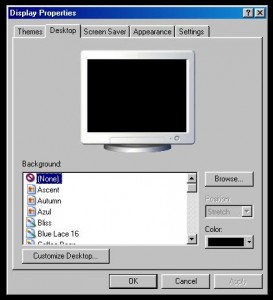
2.  The “Display Properties” box will appear.  Click on the “Desktop” tab at the top.

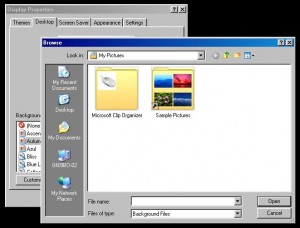
3.  From here you can select any of the pictures listed in the “Background” selection box, or you can click the “Browse” button to browse your computer for another picture.

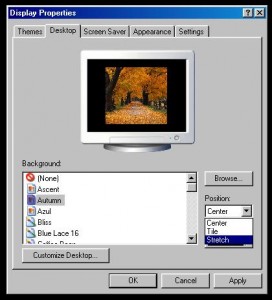
4.  After selecting the picture you want for your background from either the “Background” selection box or from the “Browse” button, you need to deside how you want the picture to be displayed via the “Position” drop down menu.  You have the choices of: Center, Tile, or Stretch.  After you select one the preview display will show you what it will look like on screen.

5.  You can also change the color of the background behind the picture by using the “Color” drop down selection box.

6.  After making all these selections, hit “Apply” and then “OK”.  You should now have the new background displayed with the choices you wanted.


Jason Thomas
J&J Computers 

Website:  http://www.jandjcomputers.com
Facebook:  http://www.facebook.com/JandJComputers
LinkedIn:  http://www.linkedin.com/in/jandjcomputers/
Share
Posted in Blog, Tutorials | 3 Comments |

How to Set your Home Page in Internet Explorer

Posted on 09/08/2010 by Jason Thomas

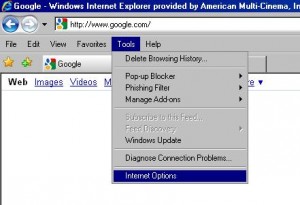
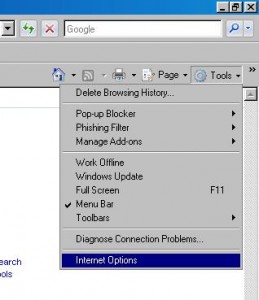
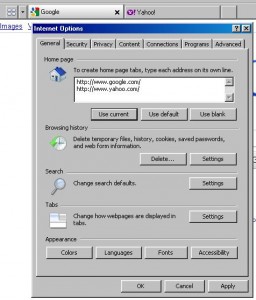
1.  Start by opening up Internet Explorer and selecting the “Tools” menu in one of these two areas.  Then select “Internet Options” on this menu.

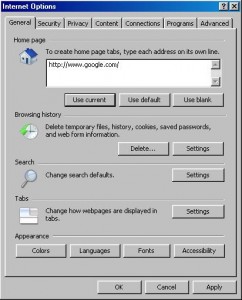
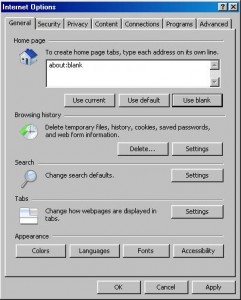
2.  This will open up the “Internet Options” box.  Make sure you are on the “General” tab.  It will look like this.

3.  In the “Home Page” dialoge box you can type in the home page or pages you want to open.  You can also select the button “Use Current” and it will automatically put in the url’s of the pages that are currently open in your browser.  For faster loads of your browser to type in your own url, you can select the “Use Blank” button and this will set the broswer to open a blank home page ready for you to type an adress into.

4.  After you are done, click “Apply” and the “OK”.  This will implement the changes and close the “Internet Options” box.

Jason Thomas
J&J Computers 

Website:  http://www.jandjcomputers.com
Facebook:  http://www.facebook.com/JandJComputers
LinkedIn:  http://www.linkedin.com/in/jandjcomputers/
Share
Posted in Blog, Tutorials | Leave a comment |

Categories

  • Blog
  • J&J Rant
  • Tutorials
  • Wifi

Recent Posts

  • Snipping Tool – How to take a Snapshot of a portion of your Windows screen….
  • PDF’s Why are they so important? A truly universal file format!
  • How to get to all apps in Windows 8 and 8.1!
  • Windows 8.1 Start Menu Returns Sort of… Start Button returns is more like it!
  • Windows 8 Video Tutorial – 3 Ways to get back to the new UI

Archives

  • July 2013
  • June 2013
  • May 2013
  • April 2013
  • March 2013
  • September 2010